


Key Takeaways
- Upcycling old bicycles is both creative and eco-friendly.
- Bike parts can be repurposed into functional and decorative items.
- Our ideas are practical for DIY enthusiasts of any skill level.
Got an old bike languishing in the garage?
Transform it into a masterpiece!
Upcycling isn't just a trend; it's a creative nod to sustainability that infuses life into the forgotten relics of our cycling pasts.
You're sitting on a treasure trove with that old bicycle of yours—ways to repurpose it are endless and extraordinary.
From quirky garden planters to stylish furniture, the versatility of bike parts can surprise even the most seasoned upcycling enthusiasts.
If you're hunting for inspiration, you’ve found the right place to kick-start your next DIY project.
Why trust us?
We're all about practical creativity.
Think of us as your go-to pals for all things upcycling.
Here, we embrace the eco-friendly charm of cycling culture, ensuring that your beloved bicycle parts flourish with new purpose.
We’ve cycled through countless ideas to bring you the best—ones that promise to transform and bring a hint of magic to your living space.
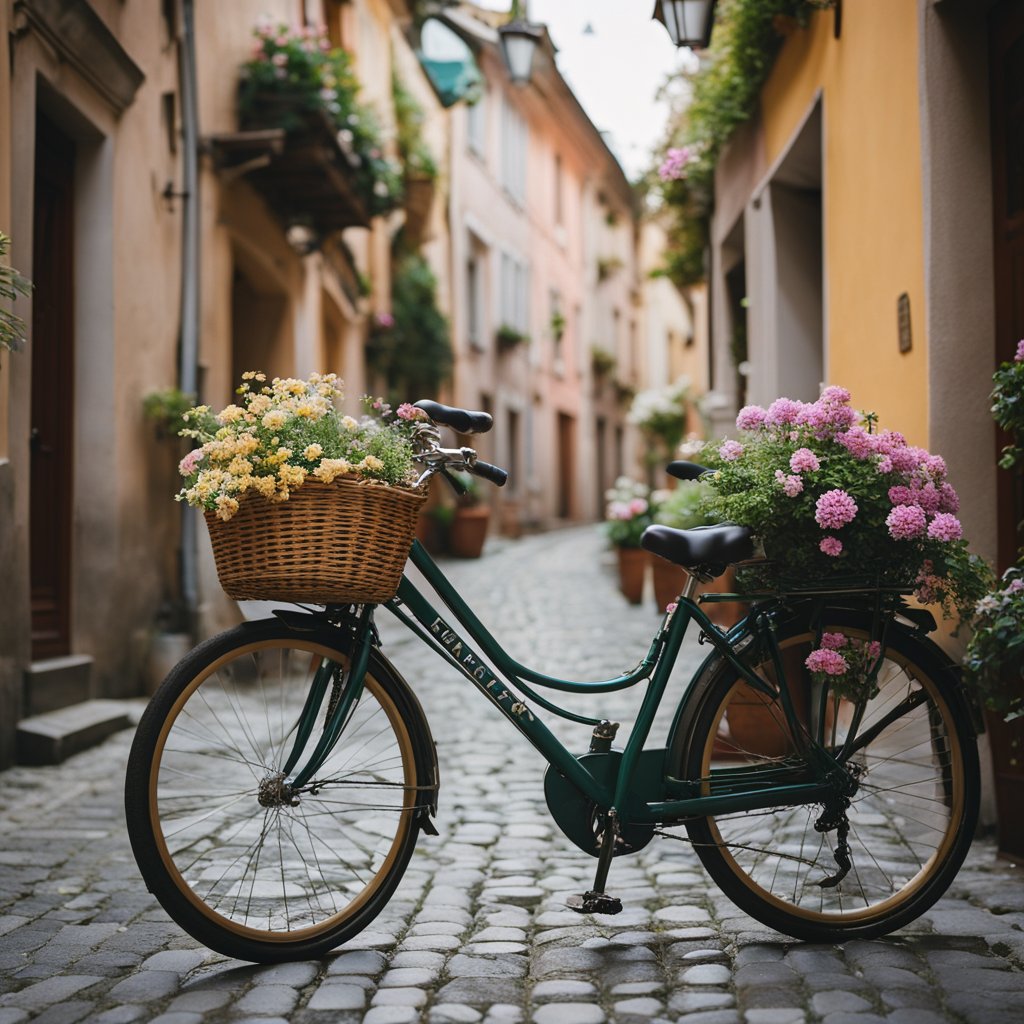
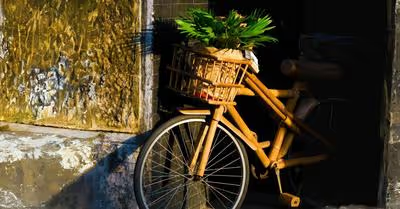
Garden Planters

Ever thought of giving your old bicycle a new lease of life as a charming garden planter?
It's easier than you think and oh-so-stylish!
Simply attach baskets or charming containers to the frame, and let your creativity bloom with vibrant flowers or aromatic herbs.
Wondering how to make that rusty two-wheeler the talk of the town?
Here we go!
Start by picking bold blooms that match your bike's personality.
How about a cheerful burst of petunias for that vintage Schwinn?
Or perhaps sedate succulents for the modern mountain bike gathering dust in your garage?
The possibilities are endless.
Don’t have a green thumb?
No problem!
Low-maintenance plants line succulents thrive in these quirky setups.
And if you’re partial to practicality, why not plant some fragrant herbs?
That way, your bike planter isn't just easy on the eyes, it’s your personal, fresh herb garden on wheels!
If you're up for a bit of DIY, painting your bicycle can add that extra pizzazz.
Imagine a bright blue bike planter, popping with contrasting yellow marigolds – what a sight!
Here are some quick steps to get you started:
- Clean your bike, because a fresh canvas works best.
- Secure baskets to the bike frame – the sturdier, the better.
- Choose plants that suit your climate and the amount of sunlight your bike will get.
- Be sure to water regularly, but don't overdo it – nobody likes soggy petals.
Your garden's about to get a whole lot cooler, and your bike a whole lot greener.
Roll out the green carpet; it's planting time!
Bike Wheel Clock

Ever glanced at an old bike wheel and thought, "Time for a change?" Why not transform it into a trendy wall clock?
It’s a perfect blend of form and function and, guess what, making one is easier than you might think.
Here's how to upcycle that bicycle wheel into something that'll make your friends go “Wow, did you make that?”
First things first, grab your wheel and give it a good clean up.
You want your new clock to shine, not to show off last decade’s dust and grime!
Now, for the fun part:
- Center Stage: Attach a clock mechanism in the hub, the central part of your wheel. This is where the magic happens, making those hands go round.
- Hour and Minute Hands: Choose a pair of hands that complement your wheel's style. Sleek and modern? Or maybe something with a vintage flair?
Next, numbers or no numbers, that is the question.
You could go minimalistic and let the spokes speak for themselves or add some numeral charm.
If you decide on numbers:
- Use a stencil to mark their positions.
- Get creative: use painted wood slices, metal tags, or even vinyl stickers.
To mount it, find the perfect spot on your wall and ensure it’s secured properly.
No one wants a time-telling tragedy!
DIY Tips:
- A yardstick can double as a mount for added vintage vibes.
- Using roman numerals can really ramp up the retro.
Not only will you have upcycled like a pro, but every time you check the time, you'll remember that you made this.
There's nothing like a homemade piece with a story, right?
Gear up for some DIY fun, and your personalized bike wheel clock will soon be ticking away with style!
Furniture

Ever thought your old bike could become part of your living room?
Well, it's time to get creative and spruce up your space with some pedal-powered charm!
Bike frames, those sturdy skeletons of our trusty two-wheeled friends, make for excellent chairs, tables, or even trendy bar stools.
Picture this: your very own bike frame table, a true conversation starter and a unique piece that reflects your love for cycles and style!
But hey, don't stop there!
Those bike wheels can become a quirky wall clock or an artsy glass tabletop—just add a sturdy base and you're good to go.
And what about those chains and gears?
With a bit of welding magic, they can be reborn as part of a chic lamp stand or bookshelf brackets.
It's all about seeing the potential in each part.
- Chairs: Bike frames with added cushions for comfort
- Tables: Glass tops mounted on wheel rims
- Bar Stools: Seat secured to the top of a bike frame
And remember, you're not just crafting furniture, you're keeping these old bikes out of the landfill and reducing waste—how's that for a feel-good DIY project?
Ready to roll up your sleeves and give it a try?
Grab your tools, and let's turn those bike bits into functional art that'll have your friends wheelie impressed!
Garden Trellis

Have you ever looked at an old bicycle and thought, "Hey, could this be my garden's next superstar?" Well, you're on the right track!
Why not transform those wheels or frames into a charming trellis for your garden climbers?
Let's get those vines twirling up a piece of cycling history!
First up, the bicycle wheel trellis.
It's straightforward:
- Clean up an old wheel—rust and dirt won't do!
- Position it vertically against a stable structure or embed it into the ground.
- Guide your plants like morning glory or sweet peas to start their ascent.
Bonus Tip: Align multiple wheels vertically for a taller trellis or horizontally for a creative spin!
Now, what about the frame?
It's a sturdy scaffold for hungrier climbers like squash or even grapes.
Here's a quick rundown:
- Remove any excess parts from the frame; simplicity is your friend.
- Anchor the frame in your plot where it can serve as a reliable backbone for your plants.
- Start intertwining! Encourage tendrils from your plants to latch on and grow upwards.
Undoubtedly, there's an artistic angle to this upcycling adventure.
Your garden gains a functional piece full of personality, while you chip in for our planet.
It's eco-friendly, it's creative, and frankly, it's a lot of fun.
Who knew that your old biking buddy would one day support a flourishing garden display?
So go ahead, give those old bicycles a new lease on life and watch your garden thank you in blooms and bounty!
Wind Chimes

Ever thought about turning those old bike parts into something magical?
Well, guess what?
Your forgotten bicycle parts can sing!
By upcycling gears, chains, and spokes, you can craft unique wind chimes that not only look funky but also deliver delightful tunes right to your garden or porch.
Here's how to hit the high notes with your DIY project:
- Gather Your Materials: You'll need some bike parts like gears, chains, and spokes. Don't worry if they're a bit rusty; it adds character!
- Create a Frame: Bend those spokes into a circular shape to form the perfect frame for your chime.
- Balance It Out: Use bike chains to balance the chime. Attach parts opposite each other on the frame to make sure it spins beautifully with the wind.
- Make It Musical: Gears can act like bells and give off a fantastic sound. Hang them at different lengths to create a range of tones.
- Assemble with Care: Couple each piece with twine or sturdy string, ensuring they're secure. You wouldn't want your creation to take a tumble at the first breeze, right?
Here's a pro tip: mix in some non-bike materials to enhance the aesthetics.
Got any colorful beads or maybe a few old keys?
They'll add a little extra sparkle and jingle to your masterpiece.
And voilà!
You've just upcycled your bike into a harmonious piece of art.
So, are you ready to give those old bike parts a second life?
Your new wind chime is not only a conversation starter but also a testament to your creativity and care for the environment!
Bike Rack

Hey there, have you ever thought about turning that old bike of yours into something super useful?
How about a bike rack?
It's a DIY project that's not just cool but also quite handy.
Let's get into how you can do this.
First off, gather your old bike frame.
You can wave goodbye to the days when your garage looks like a mess with bikes just lying around.
A wall-mounted bike rack could be your new space-saving hero.
Here's what to do:
- Choose your spot: Find a solid wall in your garage or any space where you want to store your bikes.
- Measure up: Make sure you leave enough space between the wall and the bike so it hangs perfectly without touching the ground.
- Mount it: You can use heavy-duty hooks or brackets to mount the bike frame onto the wall.
Essentials you'll need:
- A drill
- Screws and wall plugs appropriate for your wall type
- Level (to make sure your bike rack is not wonky)
Step-by-step:
- Clean your bike frame: Make sure it’s free of any dirt.
- Secure the hooks: Position them where the bike's wheels used to fit.
- Lift it up: Carefully place the frame onto the wall, and secure it with the screws.
- Test it: Gently place your bike onto your newly minted rack to ensure it holds.
And there you have it!
With a little bit of elbow grease and creativity, your old bike frame is now a brilliant space-saving solution.
Plus, you get to brag about your handiwork every time a fellow cyclist drops by.
Isn't it neat when you give old items new life?
Plus, your garage just got a major organization boost.
Grab your tools and let the transformation begin!
Lamps and Lighting

Ever thought about how old bicycle parts can light up your life?
You're not alone!
From the spinning wheels to the trusty chains, your retired bike can still go the distance by reinventing itself as a stylish lighting feature in your home.
Let's start with bike wheels.
Imagine a chandelier hanging from your ceiling, its frame no other than a bicycle wheel.
Its spokes can beautifully scatter light around the room, giving that vintage-industrial vibe that's all the rage.
Pair it with Edison bulbs for that warm, retro look.
Now, what about those bike chains?
These rugged pieces can make remarkably chic lamp bases or even intricate wall scones.
Don't shy away from getting your hands dirty.
Clean 'em up, shape 'em, and voilà!
You have a unique piece that's sure to be a conversation starter.
Here are a couple of upcycling ideas to spark your creativity:
- Desk Lamps: Gear up a custom desk lamp using various bike parts. Consider using the pedal or handlebars for that extra flair.
- Wall Sconces: Chain and rims aren't just for outrunning the other cyclists; they're perfect for casting a cozy glow on your walls.
And you know what's the best part?
You create a sustainable decor piece while at it.
It's eco-friendly, it's super cool, and it's totally doable.
Just think of the satisfaction when your friends ask where you got your funky new lamp, and you get to say, "Oh, this old thing?
I made it myself from my old ride!"
So dive into your garage, find those old bicycles, and give them a new lease of life as the perfect lighting fixture for your space.
You'll cherish the light—and the memories—every time they brighten your day.
Decorative Fence

Ever thought about framing your blooms with something beyond the norm?
Imagine a charming little fence that turns heads and starts conversations.
How about using old bicycles to line your garden pathway or to crown that corner of daisies you're so proud of?
Why bicycles, you ask?
Well, they're not just for pedaling around anymore!
When creatively aligned and anchored, bicycles or just their parts like wheels can forge a functional yet distinctly eye-catching fence.
Who knew those spokes and wheels could encircle your petunias in such an artsy way?
Here's a quick guide to get you pedaling in the right direction:
- Gather: Multiple old bikes or bike parts – the more varied, the better!
- Design: Arrange them in a row or get creative by using just the wheels – it’s your canvas!
- Secure: Make sure to firmly embed them in the ground or attach them to a stable frame.
- Accessorize: Go wild by painting the bikes or adding lights for a whimsical touch at night.
Remember, this isn't just about making a fence; it's about storytelling through recycling.
Each bike has its journey, and now they're part of your garden's narrative.
Got some bike wheels lying around?
Arrange them in different sizes for a work of art that protects your pansies.
It's more than just a barrier – it’s a statement.
And the best part?
Your DIY project is helping the planet by giving these retired riders a stylish second life.
Still, cycling through ideas?
Here’s one - salvaged bike fences are not only a talking point but also a testament to your commitment to sustainability.
So, you ready to ride the wave of upcycling with a fence that's as unique as your garden?
Bicycle Art
Ever looked at an old bike and thought, "Hey, that could be a masterpiece!"?
Well, you're onto something!
Old bicycle parts can be transformed into amazing art.
Imagine a bike wheel turned into a stunning wall clock or a dazzling chandelier.
Got some gears?
Line them up into an industrial-chic sculpture.
Here's a quick rundown on how you can create bicycle art:
- Garden charm: A bike wheel can make a lovely trellis for climbing plants.
- Sculpture: Bike chains and gears can come together to form intriguing abstract shapes.
- Functional art: Think of a book rack fashioned from handlebars or a pot hanger made from a wheel.
Why Bicycle Art?
Well, it's a conversation starter, eco-friendly, and it adds a personal touch to your space.
Plus, it's a creative way to upcycle.
- Tip: When attaching parts, super glue or metal epoxy are your friends. Let them dry well.
- Remember: Always clean and remove any rust before starting your project.
And there you have it!
Art that reflects your personality, keeps materials out of the landfill, and maybe even tells a story.
Who knew that old bike could become a conversation piece in your living room?
So, what are you waiting for?
Give those old bike parts a new lease on life and let your creativity spin!
Bike Rim Pot Rack

Have you ever gazed at that lonely old bike rim in your garage and felt it deserved a second chance at life?
Perfect, because it's just itching to be transformed into a chic pot rack!
With just a few simple steps, voila!
Your kitchen storage goes from cluttered to cleverly stylish.
What you'll need:
- An old bike rim
- Strong hooks (S-hooks work great!)
- Chain or sturdy rope
- Ceiling hooks (ensure they are rated for the weight)
Let's get crafty:
- Clean that rim up. You want your new kitchen feature to shine, not to be grimy.
- Install the ceiling hooks in your kitchen ceiling joists. Safety first – those pots can be heavy.
- Hang the rim using the chain or rope. The length is up to you; just make sure you can reach those pots easily.
- Attach S-hooks evenly around the rim. These little guys will be the ones holding onto your pots and pans.
- Hang your pots and pans on the S-hooks. Distribute the weight evenly around the rim to keep things balanced.
Just like that, you've not only given your bike rim a glorious new purpose but also brought an industrial, yet homey vibe to your kitchen.
Your pots and pans are now a part of your decor, always within reach, and, bonus, you've freed up cabinet space.
Who knew a bike rim could roll its way into being such a practical part of your home?
Remember, customization is key – feel free to paint the rim to match your kitchen or add additional flair to reflect your personal style.
This isn't just about function; it’s about creating a piece that’s uniquely yours.


.avif)
